O.k so it’s not a winner exactly, but I felt that since we had talked about the chain I’m still impressed with myself for making, that it’s something of a big reveal to show you what I did with it.
And so, without further ado,
Open the curtains please…

The Bracelet.
Dah daaah.

Lol
Bit of a let down really.
Made myself chuckle though.
And
Just because I like you, here’s a new link.
–
Take a manageable length of 16 gauge sterling silver wire and hammer it flat and file the end.
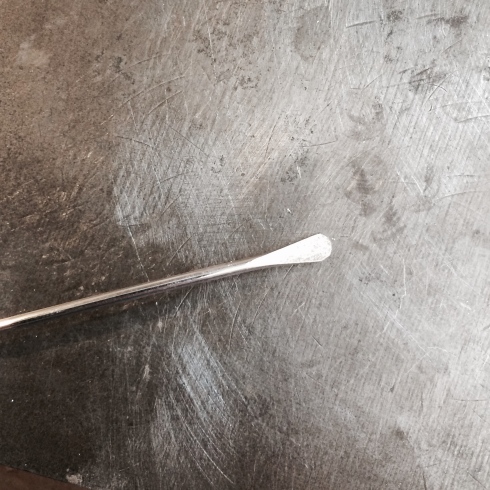
Now make a small curve with your round nose pliers at the flattened end.
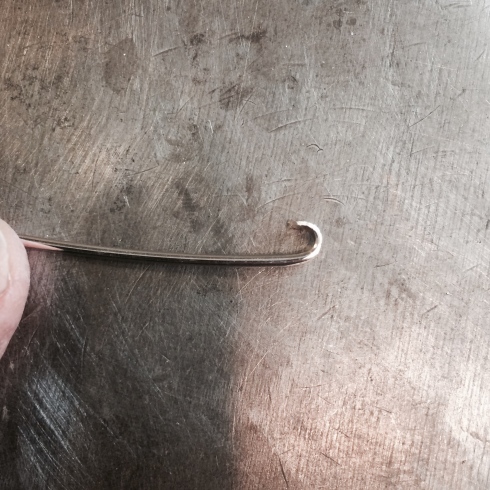
Still using your round nose pliers shape the wire into a link so that the small curve is on the inside.
As you close up the link push the wire past the end it’s to be soldered to so that when you wiggle it back into place the ends of the wire will be touching.
Annoying I know, but the two ends have to touch to solder.

As you form the link match it to a master link.

This way you’ll always be checking it against the same size and it will be easier to keep them consistent.

Now cut the link from the remaining wire

And make it a couple of friends.

When you have as many as you need pick solder the ends together.

With just the tiniest pieces of solder.

Now trim them and file the ends smooth.

And join them together with a soldered jump ring.

Then you can go to town with making another bracelet.

Because you’re on a roll.
🙂
–
Sorry that a few of the photo’s are bad quality, but you get the drift.
–
–
Thank you for the tip on making some interesting rings. And I like the bracelet. Very nice.
🙂
Love the bracelet with your chain! And I will definitely be trying out your links! Thank you!!!
🙂
Clapping ! Much clapping for you.
😉
Beautiful bracelet! Thanks for the tips. You are always so generous.
Well, I like to think of other people having as much fun as I do. Also frustration. Why should I be the only one to suffer 😉
Thank you for the info. You do great work and I am very impressed with how nice everything turns out even if you don’t think so:-)
Thanks Mary. Perhaps I am a little hard on myself, but I’m working on it 😉
Hey, I can’t for my life see what the letdown is!!? I was sort of waiting for what company the chain would get, but if that had been me, we would still be waiting. And I most certainly didn’t see THAT coming!! I was just staring in admiration. How did you dream up those frolicky ends to that sleek chain? They contrast each other so perfectly. (Spellchecker telling me there is no such word as frolicky, but I’ll use it anyway.) I was also admiring those new asymmetric links even before I read on — they add just that spark of life to your first chain. That stone at the end — is it tapered and plain bezel set, or did you use glue? (Do you ever use glue — I hate glue, always sure it will come off?)
Thanks for the tute on those links, they have the look of “the next level” for me, although easy to do. Something to keep in mind when I hopefully continue my own chain-making adventure sometime soon!
I don’t like to use glue and perhaps have given in to it three or four times, mostly when I first started and didn’t trust my ability to set a stone properly. However, I did use a spot of it on the small end stone here. I just couldn’t seem to get a good enough purchase to feel as though I’d set it well enough and it would ruin the whole bracelet if it fell out. I felt as though I was cheating but then decided that perhaps we set ourselves too many rules sometimes and that we should just forgive ourselves and get on with it 🙂
Well have a look at the June(?) issue of Art Jewelry — those earrings on the cover are glued together!! (The stones. I love reading instructions…) You are so right 😉
I’ll take a look.
I love this bracelet – really gorgeous! And you have inspired me with your example. If I ever get any sales, I’m going to donate all my profits to dog rescues and my friend’s horse rescue. So thank you.
Nancy
That’s so nice 🙂
Deborah, I just noticed those tube-like beads, did you make them, too? I love them!
Do you mean the disc’s in between the large beads? They are blobs of melted silver which I’ve hammered flat and drilled a hole through.
Hi,
No, in the second bracelet, the drum-like beads that are on the end of the line of beads. I love them!!
Oh yes, I did make them and I like them also 🙂
They are very cool!