The end caps.
–
You can make these plain or textured, wonky or straight, rustic or perfect, but these are the way I made mine for the pieces you’ve seen.
I use fine silver.
I buy all of my sheets in fine silver and most all of my wire in sterling. I like to use fine silver for my bezel settings because it doesn’t tarnish like sterling.
Sterling tarnishes when exposed to air because it has a little more base metal in it than fine silver. Sterling is .925 silver and fine silver is .999 making it purer. PMC is also .999 as is Thai Silver.
Just love the Thai Silver 🙂
Back to the project…
Cut a strip of 24 gauge sterling silver, or fine silver, sheet and texture it with a favourite stamp.
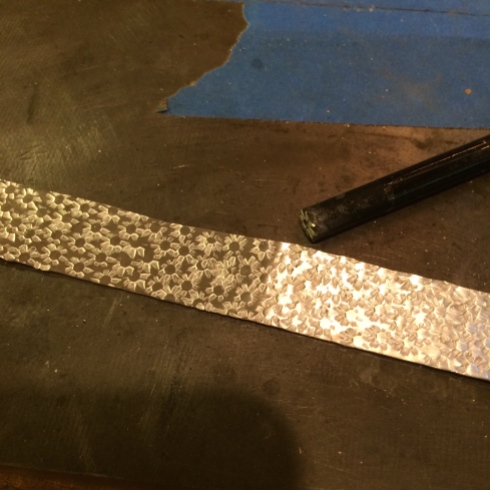
I have a selection of stamps from the Indian Jewelry Supply store – HERE
It’s like christmas every time I look at them.
Cut a manageable length off the strip and wrap it around a mandrel.

You might need to anneal the silver to do this as stamping, hammering, or any work you do to a piece of silver hardens it. Annealing the metal by running a soft flame over it until it changes colour and then quenching it, softens it again making it easy to work with.
Some people don’t quench afterward as they say the silver hardens again, but, as you may know by now, I’m too impatient to wait for it to cool on its own and I’ve found that quenching doesn’t really affect the results I want for this project.
When you’re annealing be careful not to melt the metal. It just takes practice. If it does start to melt no worries as you can then practice your reticulation skills, but that’s for another day… 😉
You want the silver to just begin to turn a dull pinkish color then take your flame away.
Now you can bend it around the mandrel until the two ends meet for soldering.
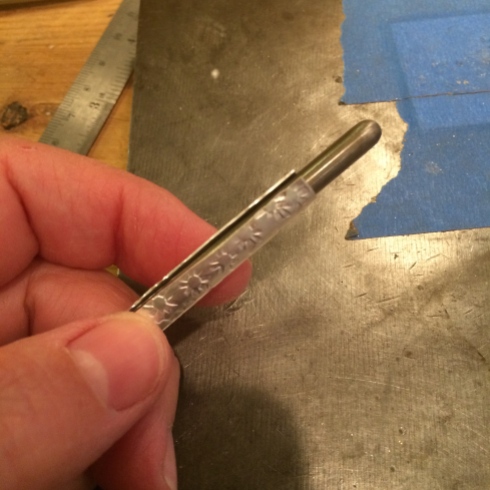
The mandrel can be anything that is the shape and diameter you want. I often use anything on hand. The shanks of my stamps or dapping tools, wooden dowels, but better still are the mandrel sets that come with a jump ring maker.
Like this
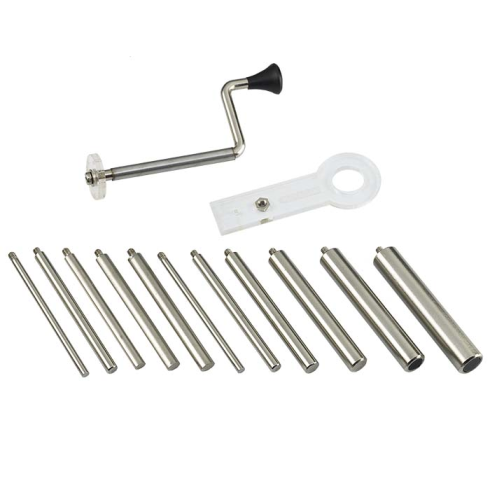
As you then have a selection which will last you forever and you can more easily match the mandrel diameter to the size of bead you’re using.
I’ll be using 8mm beads for these tube ends.
Now solder the seam.

Once soldered you can cut the tube into the lengths you want either by hanging it over the edge of your bench pin.

Or by using some other way to keep the tube secure as you saw.
This is an old paintbrush.
For this method, slowly turn the tube and gradually saw around the circumference for an even cut.

Now you can put the smaller lengths of tube back onto the mandrel so that it just overhangs a couple of mm’s making it easier to file the ends straight.

At this point you can decide whether to keep your tubes straight or make them wonky.
I like wonky.
So I use one of my dapping things to hammer into the tube to flare out the ends slightly.
And then I might even hammer them down even more to wrinkle them.
I haven’t done that here, but just so you know all of my secrets…

The next step is to punch out the silver discs which will be the end caps of the tubes.
I like them to be just a fraction larger than the tube, (including the flared out diameter), as you’re going to dome them and this reduces the diameter of the disc.

Now you can use a hole punch or a drill to make a hole in the center of the discs.

I’ve found the easiest way to use a hole punch is to mark exactly where you want the hole to be with a sharpie and then place the bottom of the punch over the mark.
Then you can see exactly where to punch.

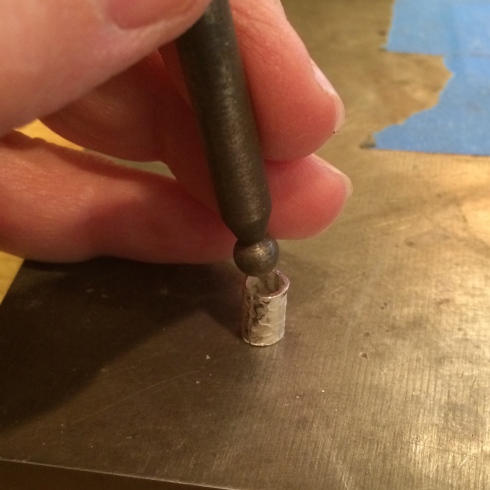
Now you will shape the discs into the caps using a dapping block.

If you don’t have these tools you can perhaps use makeshift ones.
Making shallow holes in blocks of wood, for instance, may make a good substitute for the dapping block. You can also round off a matching dowel piece to use as the punch.
For the discs you will have to either saw them or snip them. You can then file them down when they’re soldered to the tube.
At this point you are going to solder the caps onto the tubes.
You can solder the first cap from the inside.

But will solder the second cap onto the top.

Warning:
You can only do this if there is at least one hole in the silver for the hot air to escape.
If you do not leave a hole the heat will build up inside and the piece will explode!
It will fly away from the soldering board and, if you’re as lucky as me, will probably land on your body.
And it will hurt.

Now clean up the edges of the caps with a file and sanding board.

And they are pretty much done.
These are my ‘rustic’ ones, but you can make these so that the joins don’t show. It will just take more precise measuring and filing, etc.
Here’s what I did with mine.

🙂
–
–
–
Love the post. Thanks for always sharing
Thanks Dianna 🙂
Awesome and detailed! Thank you for this!!!
I have a question – if you’re going to use beads on one side, do you really need to put the disc on that side? Is there a benefit that I’m missing?
No you don’t need to. I think I just prefer it as it makes it a bead and then I can do anything with it.
Thanks for the demo. I like the texture.
🙂
Love those caps (especially on that last bracelet) AND the fact that you can manage to get these great pics while working! Do you happen to have more than two hands? (That would explain a lot.) Your paintbrush trick inspires me to figure out a way to saw jump rings without getting my own hands in the way…..
I am very good at balancing tools when I take photographs although that’s the reason for some of them coming out a bit out of focus. I can only contort myself so much 🙂
I wrap my jump ring coil with masking tape, that blue stuff, this keeps all of the rings together when I saw them. The blue stuff works better than regular tape. I like to use those jump ring pliers – now that I’ve got the hang of it.
https://www.beaducation.com/zen_products/391-coil-cutting-pliers?product_category=293-other
Holding onto things is a large part of any problem I have, so all the more reason to admire your contortions. Thanks a lot for that link. I already have that blue stuff, so maybe I’ll get the coil holder and curb my ambition by sticking to some smaller rings first.
Gale W is right. The pictures along with step by step instructions…amazing!
What have you found to be your best resource for fine silver sheet? I looked at the Indian Jewelry site and I’ve looked at Rio. Is there any better?
I buy all of my silver from Rio. There is also Stuller. A long while ago, before I knew better, I bought some sterling silver wire from an on-line store that I didn’t know and it was so saturated with copper that after soldering, etc. that’s all you could see, so I would be very careful and only use reputable sources. I haven’t tried the Indian Jewelry store for silver, and I don’t know if Rio is the best. I like Rio though.
I will go with Rio then. Thank you.
🙂
i like this thanks for showing 🙂
🙂
Wonderful tutorial today! Love the textures you have added with your stamps! I have made these “beads” with copper tubing – and added flat dics to the ends – I LOVE that you dapped the discs and “inverted” them so they snug up to the bead – fabulous!
I buy ALL my silver from Rio. I had a bad experience, as well, from another online retailer. It was wire and the silver arrived so tarnished I thought it was copper. It was also rolled so badly causing tons of kinks!
BTW – love the chain on the last necklace!
Thanks Patti
Do you find the jump ring pliers work better with the smaller coils of rings?
I thing the thingy that stops the coil may have been placed in the wrong spot on my pliers which I might have noticed if I had tried to use it sooner.
I can only use short coils on mine. Smaller diameter rings seem to work better on it, but as you say maybe I just haven’t mastered it yet.
I usually get my silver from Rio as well as most of my tools. Monster Slayer is not bad; I have never had a problem with anything I have gotten from them, and very fast delivery.
I hope that’s not the one you were referring to.
Yes, I think they could have made the slot that faces you as you hold the pliers longer. I wrap the silver coil in the blue masking tape stuff, and then hold the top of the coil with my non sawing hand finger to balance it on the ‘thingy’. When the blade starts to hit the bottom of the (front side) groove, I take the coil out and remove the tape down to where I’ve managed to cut to and the coils, then I put the uncut coil, still in its blue masking tape, back into the pliers, but at the top so that I can continue sawing and my blade doesn’t hit the bottom of the groove. I usually end up taking the last of the coil out and just running the saw along the coil in my hand.
This is a completely muddled explanation I know, but I don’t know any better way to do it. I defy anyone to tell me that they know how to use the pliers without losing their minds…
I’m going to check out Monster Slayer now as I’ve not heard of them.
Thank you so much for this! You are a kind and generous soul! And very talented, also! I wish we were neighbors!
Nancy
You’re welcome Nancy 🙂
Thanks for sharing how to make this bead — I was going to comment on it in your previous post, but I never find the time to comment as often as I would like. I just end up thinking up the comment in my head, far away from the computer… You see, you make an impact with your blog: I don’t just read and forget! Hadn’t figured out that there were end plates soldered on! Definitely have to try something similar! (The best thing: you can decide the diameter of the holes depending on the design, like fitting over leather cord!)
As to silver sources, I’ve been advised to use only reputable dealers, and be wary of unusually low prices, since the price of silver is what it is on the world market, and if someone sells “silver” substantially below that, it is probably something else! But you’re not interested in my sources, since they are Scandinavian…
I’ve used wooden sticks as combined mandrels/sawing support, and it works a dream with sterling, but causes mental breakdowns with bronze: that is just too hard to be sawed without pain! The bonus with the sticks is you can tape two together and get a real cheap oval mandrel (a nice secret, but I actually saw it in a book: I READ the books first, then I jump in without going back for that chart that I can’t find… re. your previous post! I just love detailed instructions.)
Love the oval ring tip 🙂
Thanks for writing Monica. I love hearing from everyone as it expands my world and I feel that I have a lot of new ‘friends’ 🙂
I don’t even make jewelery but I still love to read these posts, it makes one truly appreciate anything handmade much more. I love to see things evolve and become THINGS right before my eyes. It is fascinating. Thank you
🙂
These are gorgeous! I would love to see how you solder that tube–but I imagine that is a basic soldering skill. (I would gobble up any YouTube fav on tube soldering, should you care to let one drop….) And by the way, you suckered me right into a pile of wonderful stamps from Indian Jewelers Supply. Wow, I had no idea such things existed. FABULOUS!!! Thank you for all you share, you are enabling so much creativity out here.
One can never have too many stamps 😉
Thanks for the explanation on the jump ring holder. I also should mention Hoover and Strong and Hauser and Miller. I think they are good suppliers. Sometimes they might have things you can’t find elsewhere. I haven’t bought too much from them lately. Fabrication charges may be just a little higher than Rio. And I just remembered All Craft in New York City. Website not remarkable but I think a lot of jewelry artists buy from them. I just bought a Delrin stake by designed by Eid/Longhi, the ladies who wrote the book on metal forming. Very nice and available in 4 sizes. I have just developed an interest in making anticlastic bracelets. Ah but I’m rambling. It’s just nice to share info.
Thanks Sue 🙂
Do the punches of your BeadSmith 1.2 mm punch hold up well? I have a Eurotool 1.2 punch and it seems so easy to bend the hole punch. Two or three punches and that’s it!
Yes, I’ve not had any trouble with it at all. It came with a replacement tip, but I haven’t used it yet. I’ve had it for about a year or so, but I don’t use it all of the time.
Sounds like a BeadSmith punch needs to be in my future!
I just bought myself a disc cutter. (does happy dance) Well. I told Mr G he can give it to me for my b’day next month, but I’m not waiting till then to play with it 😉 I think I might start out trying to make a couple of your barrel beads…Thank you for yet another really well written and generous tutorial.