Of course this doesn’t always go according to plan.
I’m just a little too impatient to read all the books and watch all the YouTube how too’s.
I just like to look at the pictures and wing it.
So I’ve made a few of no go’s over the years, and that’s o.k. as sometimes new ideas come from them.
I tell you this as I just want to remind you that, for most of the time, I don’t really know what I’m doing. I would hate for you to think that I have the best advice out there, even reasonably o.k. advice.
But I just love making stuff and think that if you want to have a go at something you should just do it without thinking you have to be some kind of expert at it who never makes mistakes.
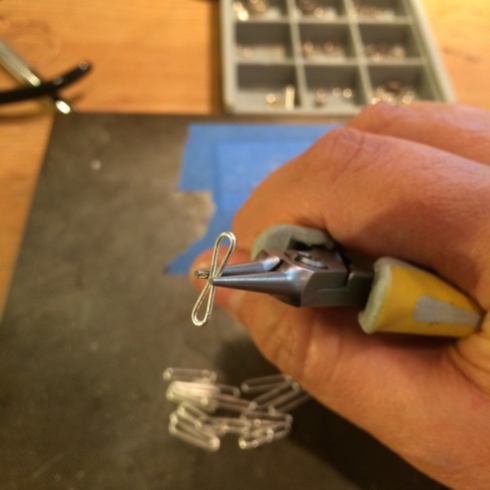
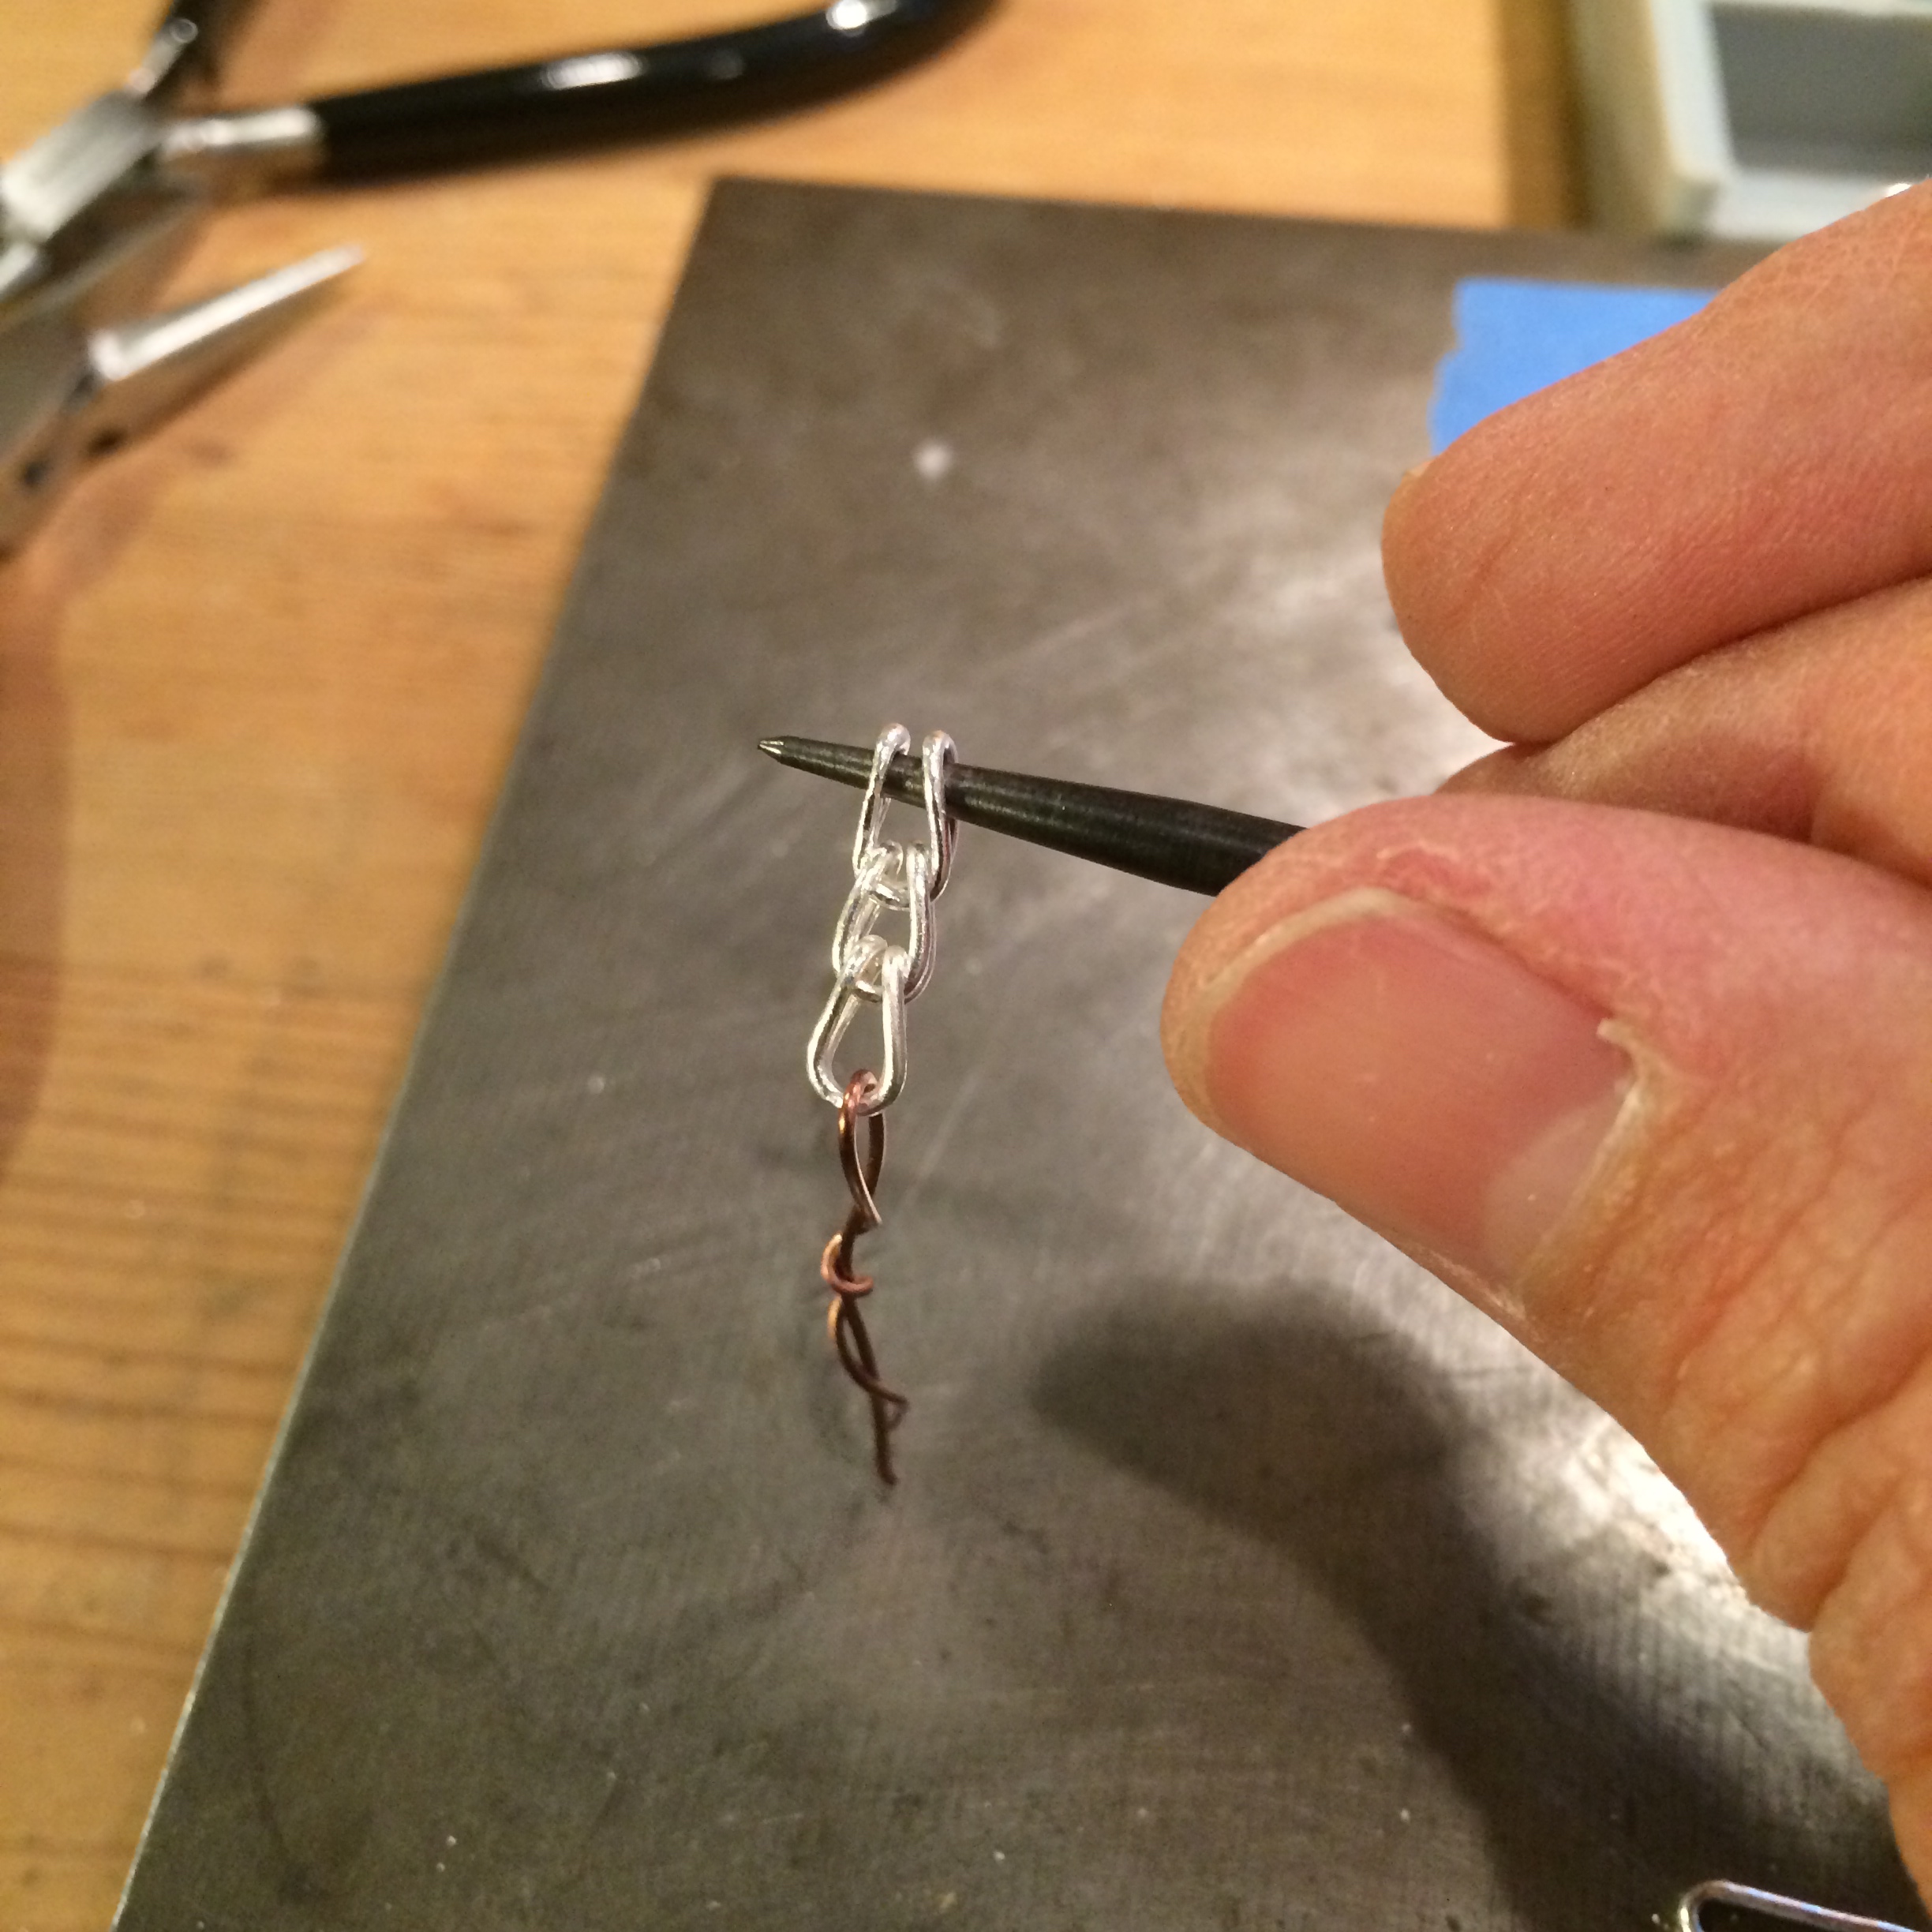
Here’s a mistake.

Oh yes, it looks all fine and dandy I know, but it’s stiff and lifeless.
The gauge of wire is too thick for the diameter of the ring and the chain can’t move freely.
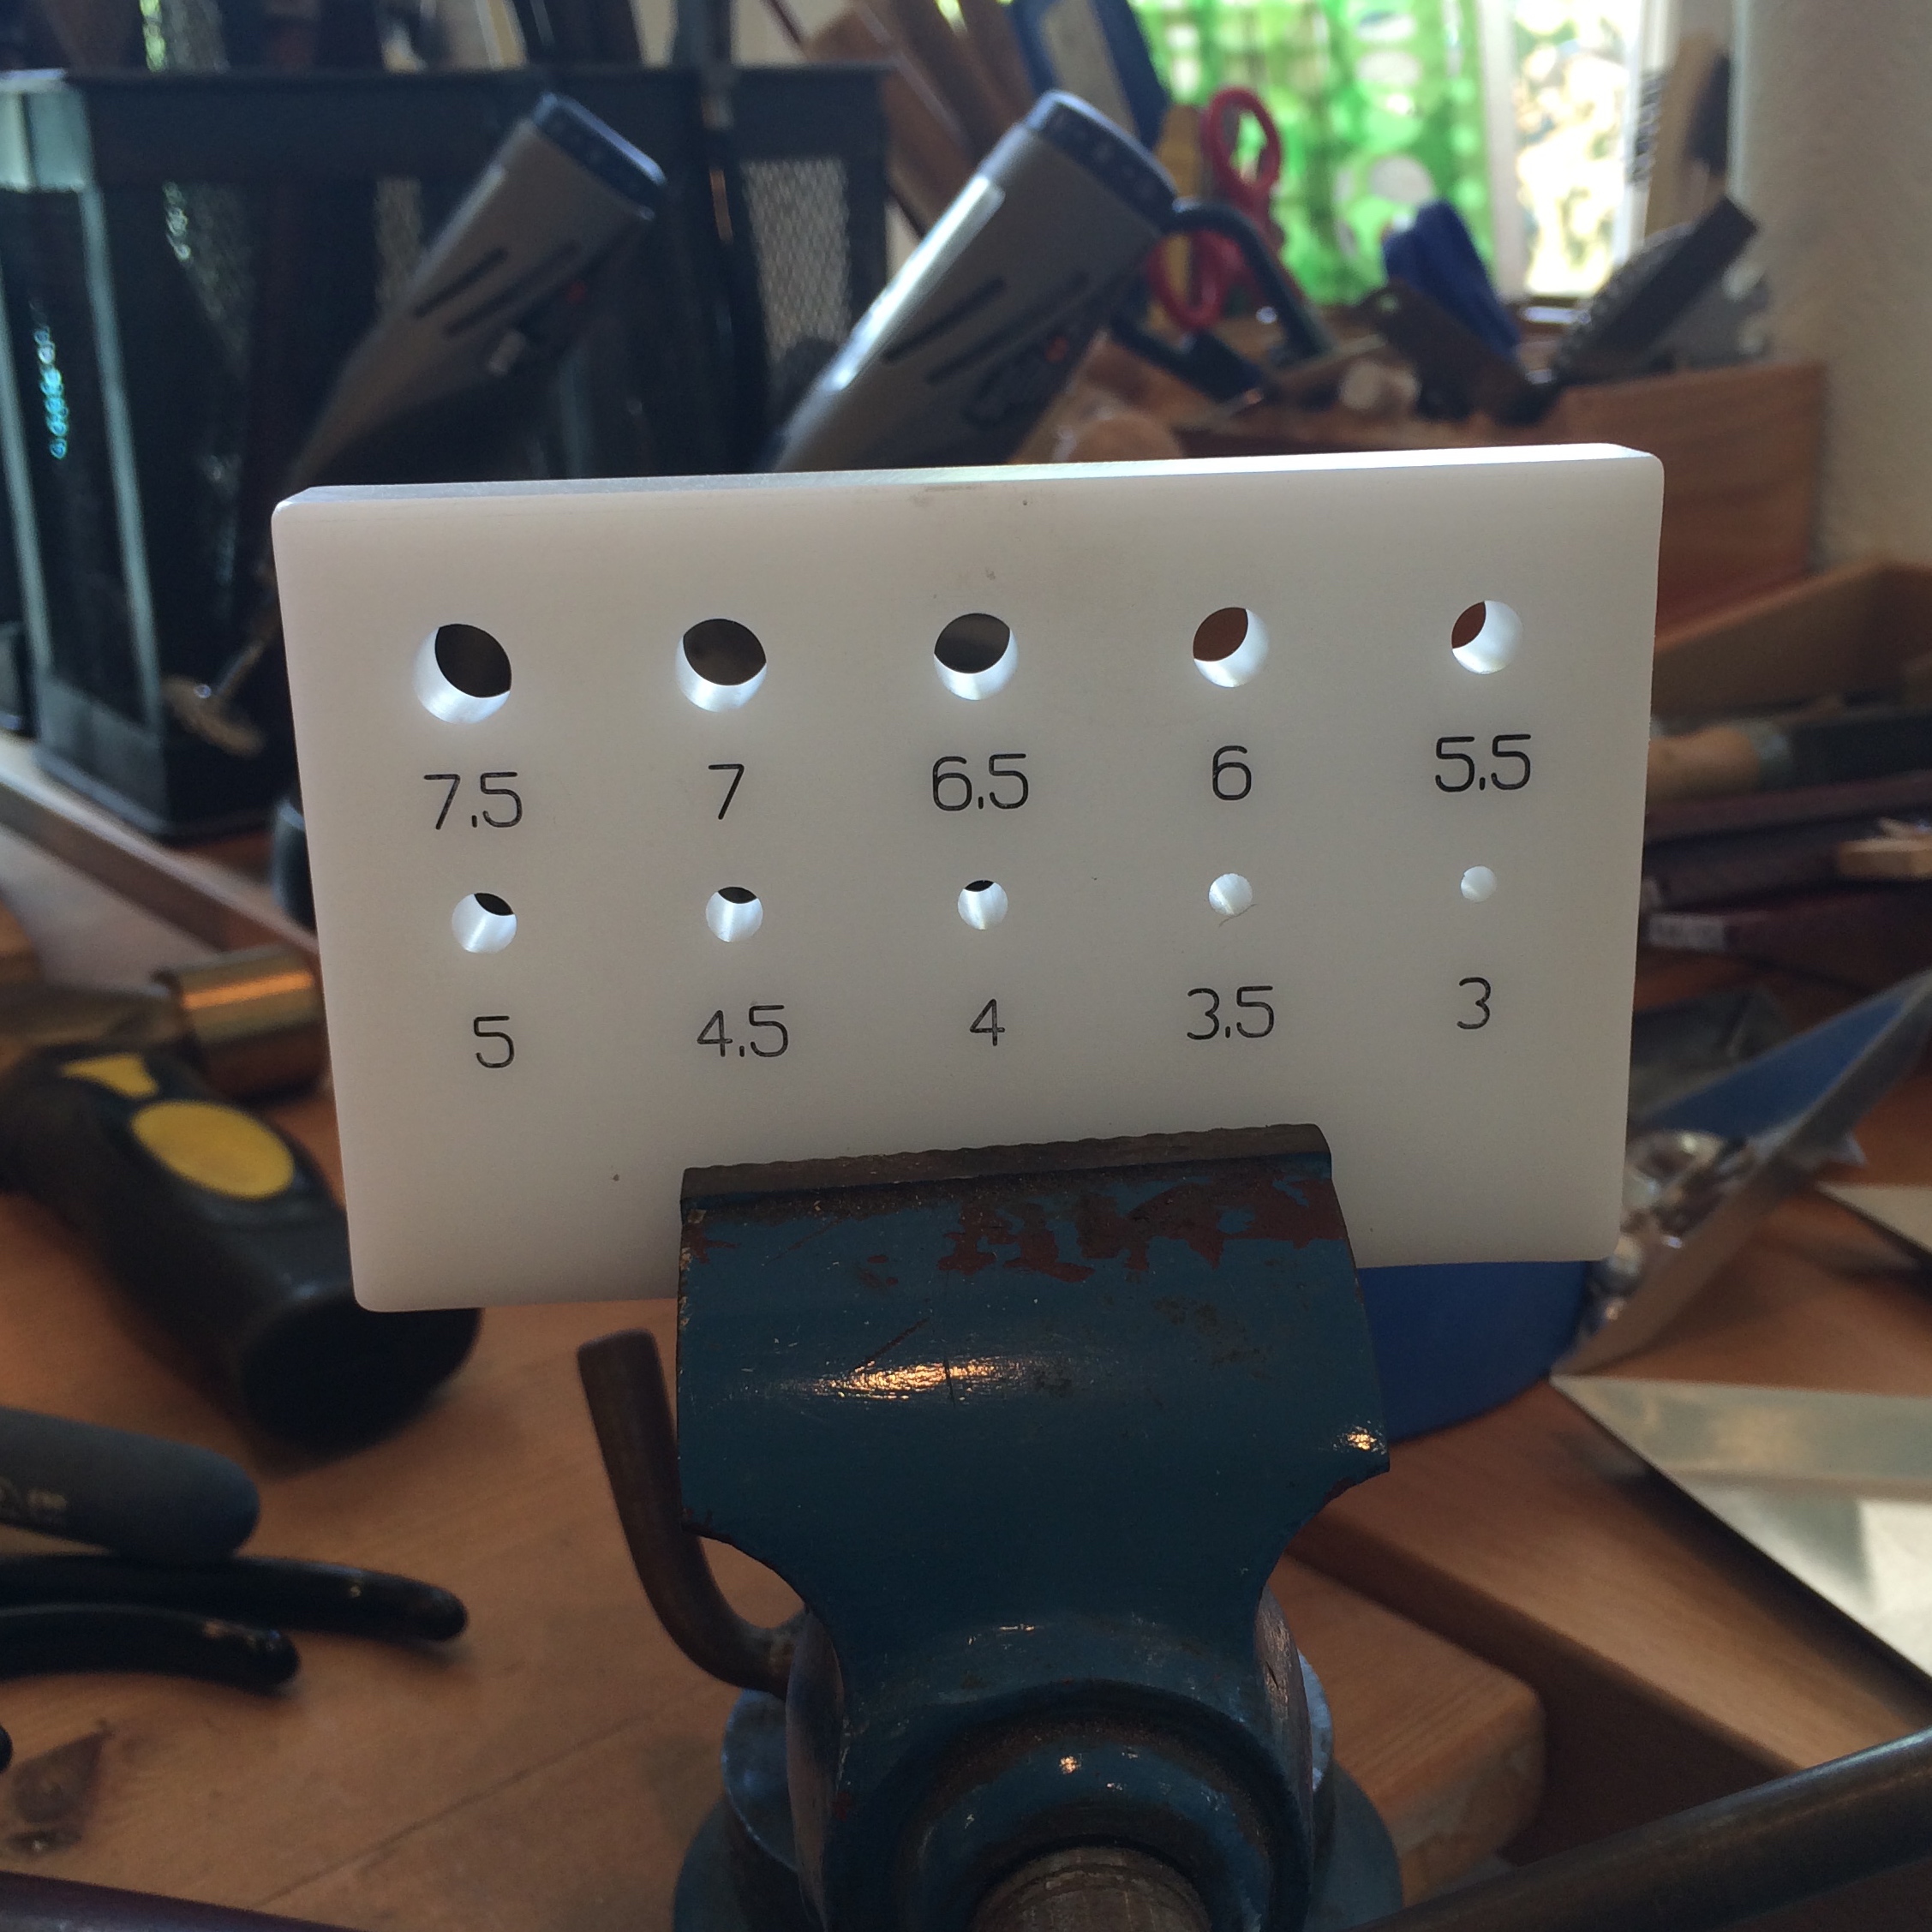
Now, I know that when you’re using rings to make a chain you need to know the ratio between the wire gauge and the diameter of the ring.
Yep. I know that.
But when I want to make something and I get excited I ain’t got no time to go looking for a chart or read the books, so I eyeball it, make a wish, and have a go.
Don’t try this at home folks.
Actually I wasn’t far off. I think half a millimeter may have done it.
Or maybe one.
(See, I’m doing it again.)
Don’t do it people!
Get a chart.
(I haven’t found a chart yet but I’m looking.)
If you have a chart I want one in millimeters, not fractions. I can’t be doing with all of that 5/16 stuff unless you’ve also got a chart for turning 16th’s into millimeters.
Math is NOT fun for me.
Web surfing is, however, so I’m off to find my chart as soon as I finish up here.
So the chain wasn’t a waste of time really, because I also decided that sterling silver hurt my fingers too much. But using sterling silver wasn’t a waste of time either as I soldered each link perfectly, not always a regular occurrence, so that was pure satisfaction right there.
See.
So next up I made another chain, this time using 20 gauge fine silver with the 8mm mandrel.
Much better, but I’m going to make another today using the 8.5 mandrel.
You should have a go if you haven’t yet.
It’s fun.
And the sense of accomplishment having made your own chain is a wonderful thing.
Warning: I may have mentioned that I still haven’t got ‘the chart’ so you might want to wait until you, or I, find one or I actually make a chain that’s perfect.
Don’t hold your breath on that last part.
–
So.
Single Loop Chain.
(This is going to be boring for people who already do this, so stop reading now unless you need a nap)
20 gauge fine silver 8mm mandrel
Make your jump rings and fuse them together.

I use a hard charcoal block for this.
The most important thing to remember when fusing silver is to make sure that you have no gaps in-between the two parts you are fusing together. The join has to be completely touching. If you have any gap at all, however tiny, the ring may fuse, but you can end up with a thin area of the ring which will be weaker than the rest of it.
So preparation is key.
Place the rings on the block with the joins all facing the same way. If you’ve done your job right and the ends are flush against each other it can be really hard to see where the join is so this eliminates that problem.
You want your flame to be a little softer than perhaps you usually use so you can turn down the pressure on your regulator a little to get it to a nice balance that will heat the silver, but isn’t so fierce that it melts it.
Now keep the flame moving around the ring until you see it just start to change, then quickly hover it over the join and take it away immediately the silver flows.
Keep the flame there too long and it will melt into a ball. Then you just continue to melt the ring and add it to your ball collection.
This might grow considerably as you practice.
It’s o.k. 😉
You want to keep the flame moving around the ring as the whole ring should be brought to the same temperature. If you get a gap, or a thin area, where the join is you either had a gap there to begin with or you have heated one side of the ring a little more than the other and the silver has gathered there pulling itself away from the join.
It’s just practice.
You don’t need any solder or flux to fuse these fine silver rings together.
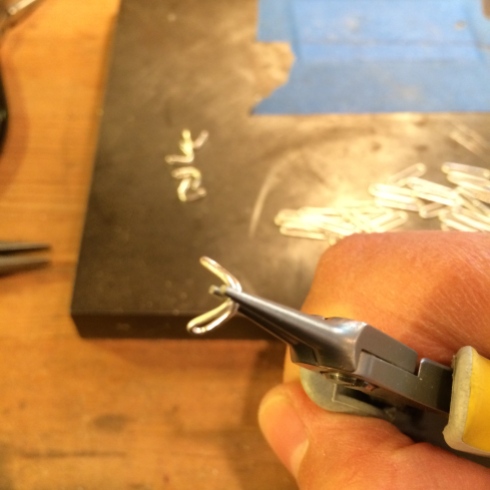
Now you are going to stretch the rings out using a pair of round nose pliers.

Try to keep the rings at the same place on the pliers each time you stretch one as you want your shape to be as consistent as possible. I use the tips about 2mm down. You can mark the pliers with a sharpie or tape if you need to.
It’s at this point in the game that you’ll discover if your joins are fused properly.
It’s good to find this out now rather than later, so either re-fuse the broken ones or add them to your ball collection.

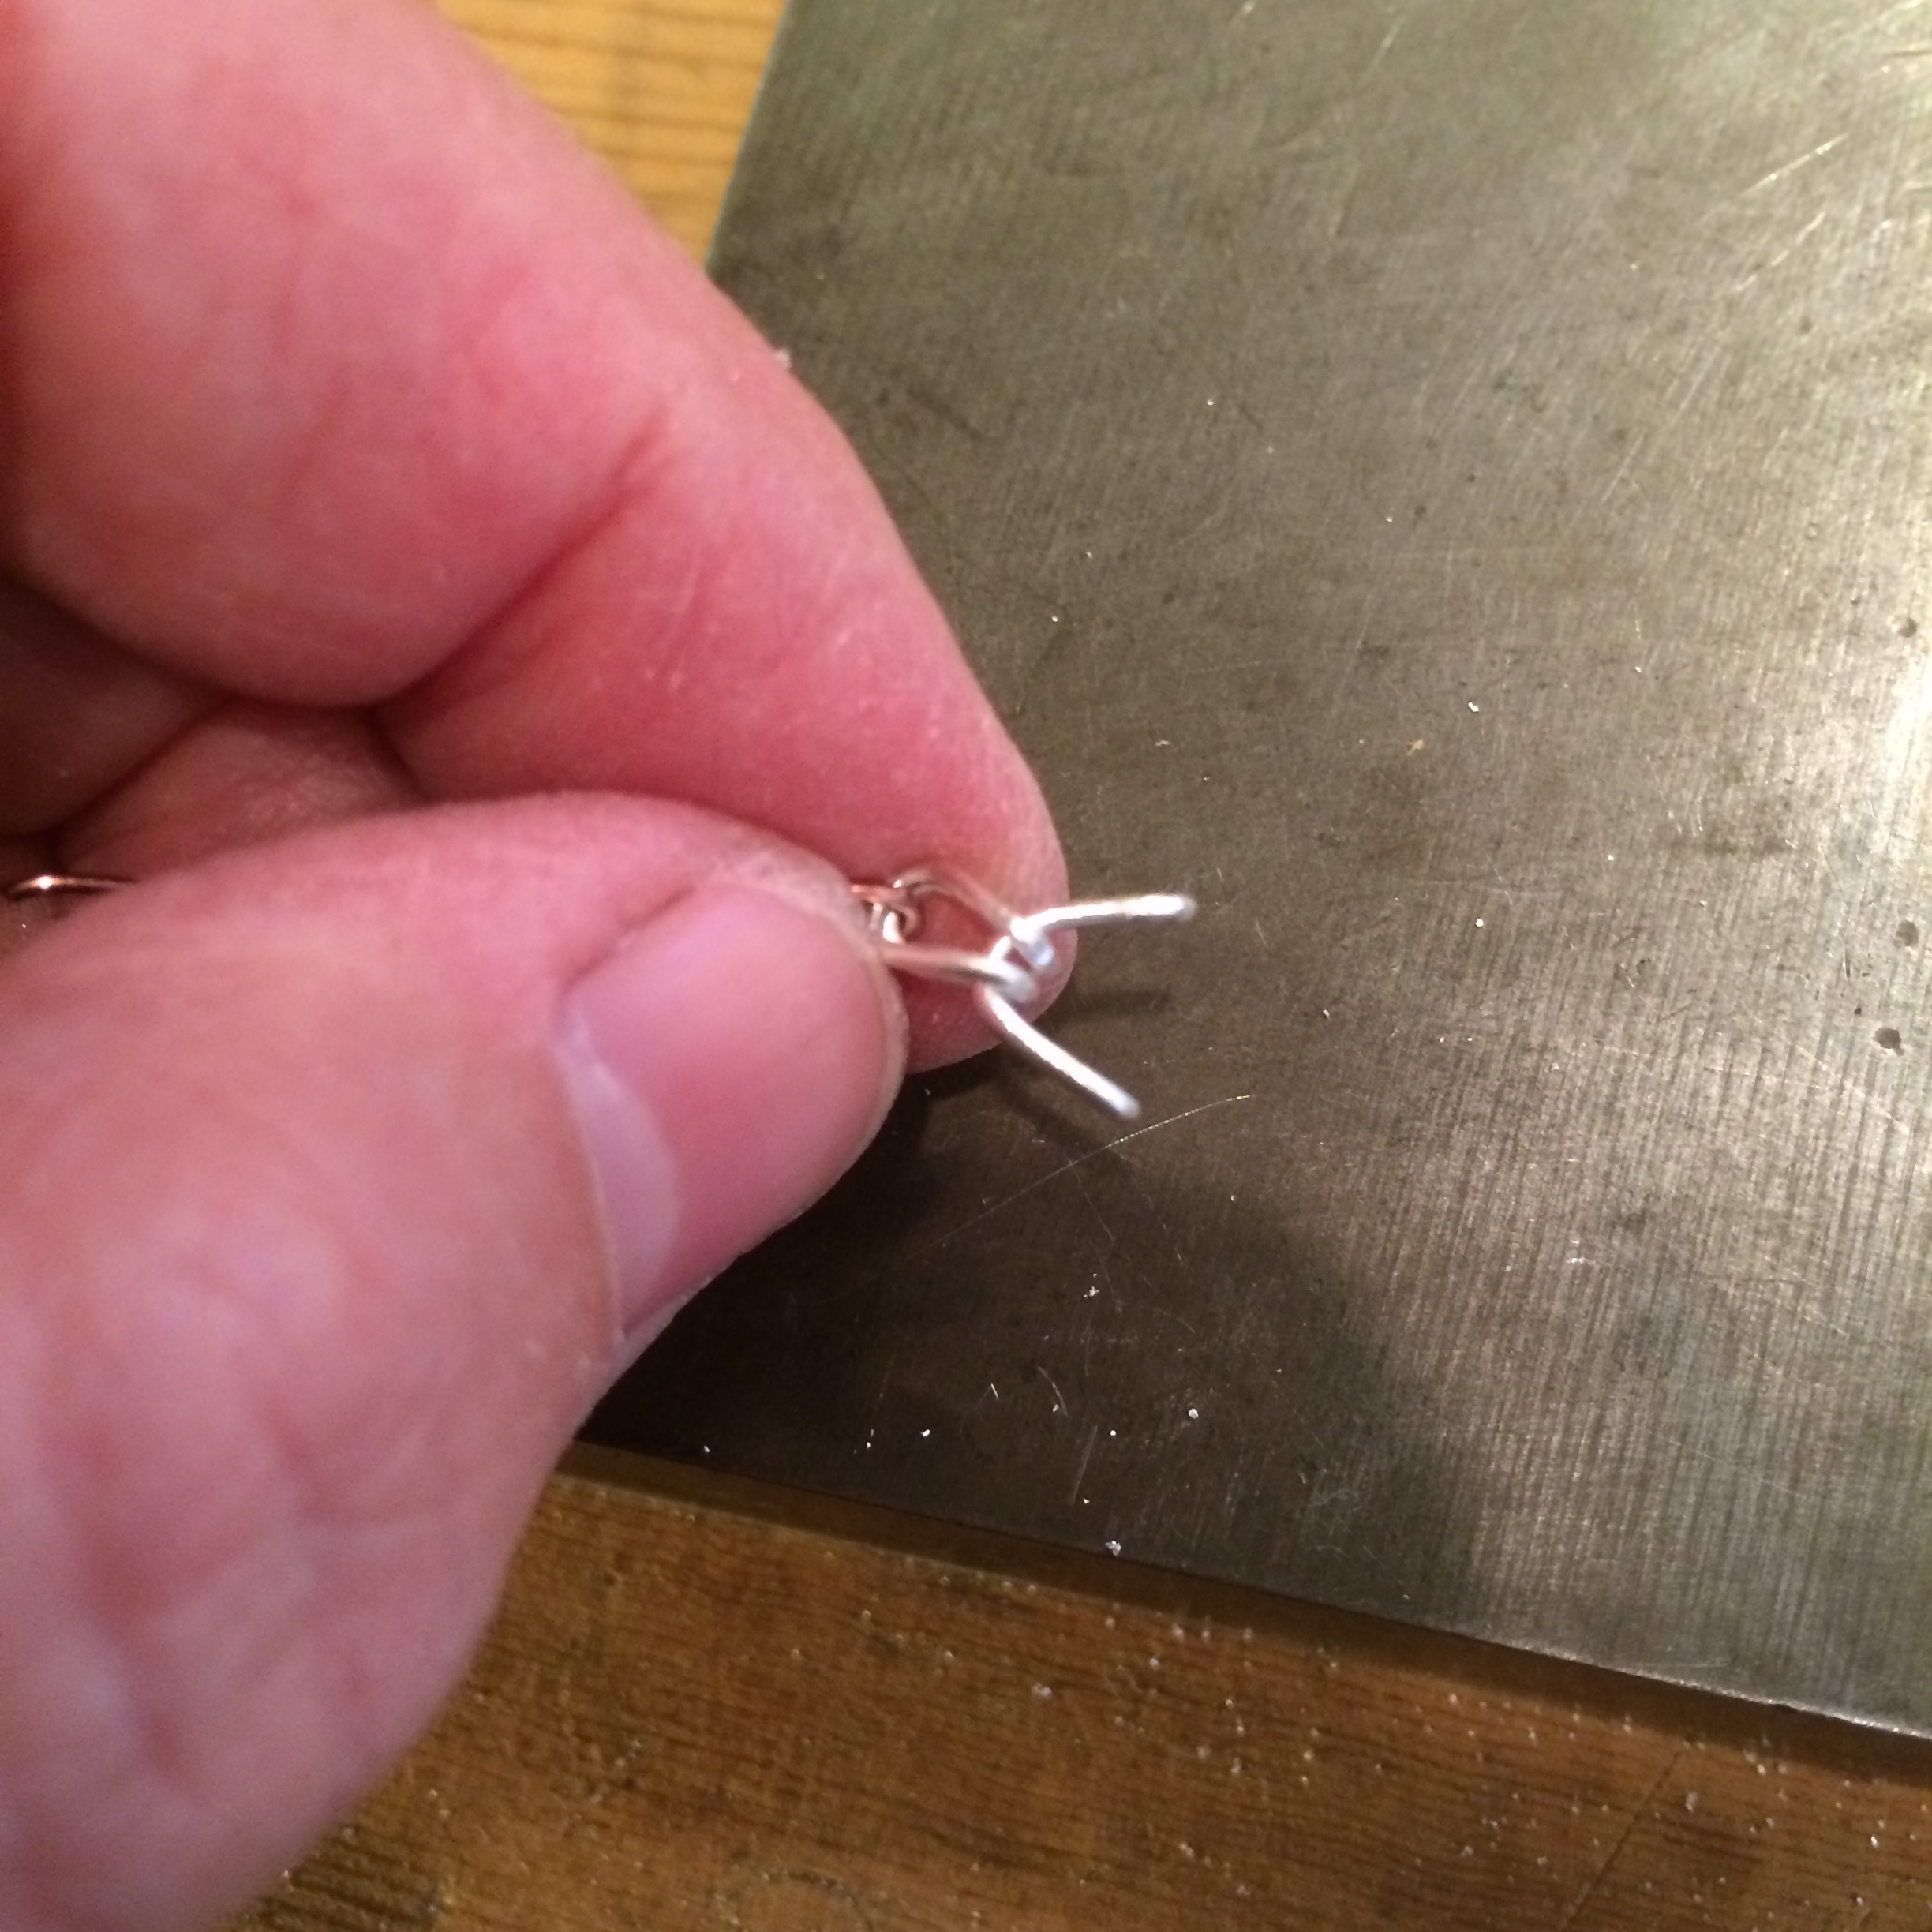
Now squeeze the middle together.
And bend them in the center.

Use a length of wire, (I’ve used copper here), to anchor one end of the link and push the top ends together.

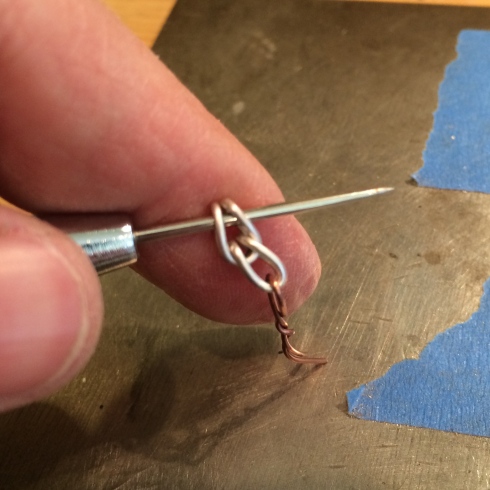
Now you can slide another link into the first.
To do this you may have to squeeze one end of the second link together slightly so that it fits through the hoop in the top of the first link.

Also you can push an awl, or your center punch, through the hoop you wish to thread the next one into to widen it slightly.
Now you just continue to make the chain until you get to the length you need.
Once it’s completed, anneal the chain by gently running the flame backward and forward over it until the surface of the silver just changes slightly, and then quench it.
For the next part you’ll need a draw plate.

I bought mine HERE, but you can find them anywhere, and any kind will do. I just drilled a hole through an old piece of wood before mine arrived.
Once the chain is annealed pull it through the draw plate to even up the links and make it look beautiful.

You just want to even up everything at this point and not stretch it so be careful which hole you pull it through.
The chain will be crunchy afterward so just loosen it up in your fingers and then voilà!
You are done.
Finish it however you prefer, I like to blacken mine, and then make something extraordinary with it.
Go on. You know you want to.
🙂
–
P.S. Remember Ann Cahoon has a great visual tutorial on chain making – HERE
–
–
–
Thank you for sharing this information!
🙂
Thank you for your info. I have that video as I mentioned once before,and I tried her 22 ga fine silver and a 6 mm mandrel. NOT good. No movement. I ‘m perfectly willing to admit that I am no where as good as she is but I have done chainmaille before. I found it difficult to fuse that very thin gauge. Putting it together was problematic also. Once again I admit that I’m not talented as Ann is, but if I were to teach people to do this technique I would go larger to make it a little easier. I also had been thinking about 20 ga and a larger mandrel. I hadn’t thought of an 8 but that sounds really good. Thank you. And next time I will only make a few rings to experiment with. Anyone need some 22 ga fine silver rings of a 6mm size?
Thanks again for your explanation..
🙂 lol I bought some 22 gauge also, and will give it a go. I think the 8 might still be too small for 20 gauge though.
The book I referred to recommends starting out with 20g at 5/16″ (7.9mm). I am not a “jump in” sort of person, so I have no idea if that is a wise recommendation!
Oh cool. I was o.k then with the 8mm. I still need to find that conversion from fractions to mm though.
I’m still trying to figure out how to saw jump rings…. But meanwhile, I found your chart. In my copy of CLASSICAL LOOP-IN-LOOP CHAINS. I even just bought a scanner for 20 bucks and scanned it for you….but I have no idea how to attach it here. (Alas, it uses fractions, but there’s a another chart for converting; I guess I should scan that too and go look for an email address on your site.)
So you are officially my favourite!
[email protected]
You’ll now have to eat my e-mail so that no one else can see it 😉
Wait! I have that book. Man! Told you I don’t read them.
I already scanned it, so I’ll send it and you can pin it to your table. I don’t know how to eat your address though. Too many challenges for one day….
lol Thank you Gale.
My pleasure.
I have been wanting to make this chain myself for a while. I actually found instructions in a chain making book I dug out. It calls for 20 ga but can’t remember the mandrel size. I was thinking of ordering solder filled sterling so all I have to do is flux and heat but now I’m re thinking that….the fine silver saves me the fluxing and pickling time. Thanks for posting about this!!
You should try it with the fine silver. I finished the bracelet I was making and the 8mm mandrel was fine with the 20 gauge 🙂
PS I forgot to say your change looks beautiful!
🙂
Any recommendations for doing this technique with copper? I want to get more deeply into chain making and most of my jewelry is created from copper – and Argentium. I have been fusing the latter successfully and soldering the copper with the silver solder, but I am wondering if there is something for the copper that is more inconspicuous, as the silver clearly shows.
I don’t, sorry. I like copper and bought some copper solder paste to try to eliminated the silver look of the solder, but it still shows. On the more rustic chains the solder doesn’t matter, but I wouldn’t like to see it on this one. Who knows though, you might come up with a completely new design look 😉